Who can access your files?
This is a pertinent question. Knowing who can access your files and – maybe even more important – which files you can access, will save you a lot of headaches. Countless are the times I got a “Permission Denied” error when working on the command line.
Let’s first figure out how access to files and folders is arranged in Linux. When you ran ls -l you have probably noticed that the command not just returns the names of the files and the folders but also extra info that looks a bit cryptic.
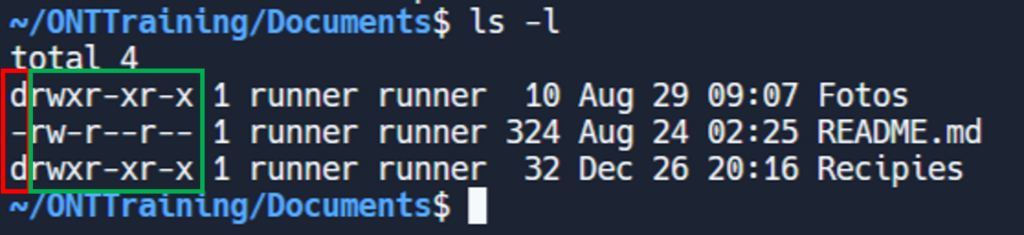
The first character on each line (red) specifies whether the line refers to a folder or a file:
- d for directory: it specifies that the line contains info about a directory
- – for file: it specifies that the line contains info about a file
The next 9 characters (green) are called the mode and specify who can access the file and what he/she is allowed to do with it:
- w for write: the user can write to the file
- x for execute: the user can execute the file (relevant when the file is a computer program)
- r for read: the user can read the file
- – for no access: the user has to keep his/her hands off the file
Ok, now we know what users can do with the file but we still don’t know who can access it. Well, there’s a reason there are 9 characters specifying the privileges of each file and folders. In theory, 3 should be enough: read, write, execute. That’s it. These 9 characters must be divided into 3 groups of 3:
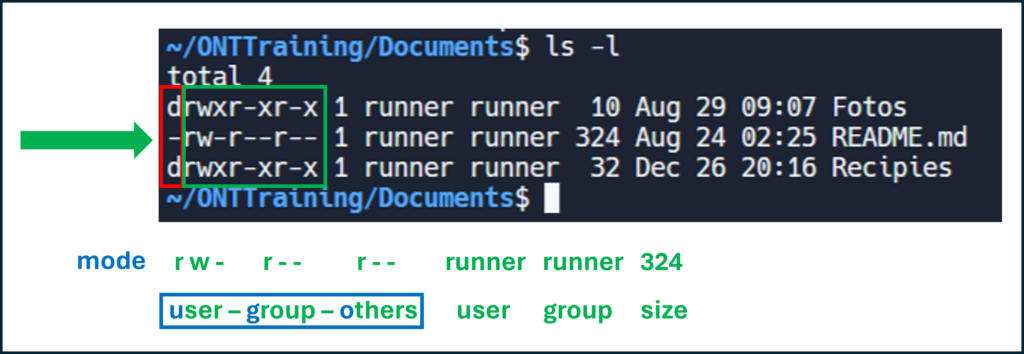
- the first group of 3 characters refers to the owner of the file
- the second group of 3 characters refers to the rest of the group the owner belongs to e.g. your co-workers
- the third group of 3 characters refers to the rest of the world, the others
Most Linux systems do not use groups. For instance, on your personal laptop it doesn’t make sense to introduce a group of users that has certain permissions. However, in complex systems with many users (work, school), groups are used to make the lives of the sys admins easier. When a new user joins, instead of finding all the files he needs and setting the permissions one by one, they just add the user to the correct group, done…
The name of the owner and the name of the group is also listed in each line. In the example above the owner of the files is called ‘runner’ and he/she can read and write to the file README.md, whereas the rest of the world is only allowed to read it.
So when you run into the dreaded “Permission denied” error, it means that you are trying to do something for which you do not have permission. You will be pleased to know that there is a command chmod (change mode) that will help you change permissions.
For each user you can specify the permissions:
- u for user: will change permission for the owner
- g for group: will change permission for the group
- o for others: will change permission for the others
- not specifying the users will change permissions for everyone
You can add or remove permissions:
- + will add permission
- – will remove permission
The permissions themselves are represented by the same characters as used in the listing:
- e for execute
- r for read
- w for write
A few examples to hopefully make you see the light:chmod +x script.sh
will make the script executable for everyone.
chmod u+x script.sh
will only make it executable for the owner of the script.
Please note that chmod is not always permitted. You can only chmod the files and folders you own and on some systems, like the VSC (Vlaamse Super Computer), there are higher level mechanisms that manage the use of chmod.
1 – Click to do exercise in a controlled environment before taking the quiz:
LinuxSurvival (change file permissions, part 2)
2 – Practice a bit more on your own computer:
Open Replit, go to folder Documents, and change permissions of README.md file.